Showing posts with label HTML5. Show all posts

The Definitive Guide of HTML5 to Devs, Pros & Cons with Graphics


Dipesh Mukerji, a Sr. Director, Product Strategy and Marketing of Kony, Custom Application Development Platform shared HTML5 definitive guide infographic for pros, cons and devs. So enjoy it here on EthicalWeb


HTML5 in iOS 8 - Apple Supports WebGL and IndexedDB for Web Development

There is good news for web programmers as support for standards has been added by Apple's new iOS 8 that allows developing interesting games and more productive websites. Safari, which is developed into Apple’s operating system, can run Web software that written to use the IndexedDB standard to store data that can be used without a network connection and the WebGL standard for hardware-accelerated 3D graphics.

HTML5 role in iOS8

The best thing about Web-based games is it can speed up 2D graphics and another is for tools like word processors, e-mail, or blog-posting for those people, who don’t want to lose their work when network access is disconnected in a tunnel or a plane. iOS is a likeable among programmers and thus, we find Apple makes are essential.


iOS8 Latest Features

As it is more widely supported a new standard, most of the HTML5 web programmers are using it instead of worrying why software doesn’t work on one browser.

In addition to, you will find many features listed in latest iOS 8 that used in HTML5 web application development such as:


CSS Shapes Level 1

CSS Shapes Level 1 rarely seen features and but finally it is available with prefixed support in iOS 8. Previously, this feature is available in Chrome, Chrome for Android and Opera that allows developing more dynamic text layouts that gives looks of magazine to your web pages. Check out Shapes from Adobe for more examples.


SVG Fragment Identifiers

SVG Fragment Identifiers is one of the powerful features that currently available in Chrome for Android, IE 10, 11 and Mobile, and iOS 8 Safari. It allows for very powerful vector spritesheets. It is essential for web gaming, more dynamic icons and other UI elements.


HTML Templates

Web Components is now obtainable in the latest Android and iOS browsers. It is one of the biggest steps that makes a truly modular web and can open up with huge potential with one less polyfill needed.


WebGL for 3D Canvas Graphics

One of the excellent features web developers is it supports Hardware-accelerated 3D Graphics, which is mostly used in gaming. Developers can also use such kind of features especially for animations and transitions. Want to know more about WebGL Sprite Particle? Check out this Demo.


IndexedDB

We all know that WebSQL has been available for iOS and Android but not supporting Internet Explorer. The Web SQL Spec will have to be dropped in a future version. The good news is now IndexedDB available across iOS, Chrome for Android, Android, Safari, IE Mobile, and can also support Blackberry 10 and IE 10/11.


Navigation/High Resolution Timing APIs

Having a streamlined performance timing API will enable to deliver better cross-platform benchmarking and performance testing through superficially not an exceptionally popular end user facing feature.


These are some amazing features that we find while we get HTML5 in iOS 8. Want to adopt such features in your project? Then contact me.

Advantages & Disadvantages of Using HTML5 for e-Learning Development

With increasing the use of mobile devices by learners, the demand of HTML5 is gone up as it becomes the forefront of eLearning development. We all know that HTML5 is the current version of Hypertext Markup Language by which eLearning professionals and experts are able to publish and deliver the content to the learner's iPad, iPhones and other smart-phones.

eLearning with HTML5

Using this high-end language for eLearning development, users can get many benefits and make their work a lot easier as well as simpler than before. Here are some major advantages of HTML5 for eLearning development:


Extremely Helpful in Embedding Audio & Video:

Since the inception of HTML5, the embed of audio, video and other multimedia content becomes a lot easier as HTML5 embedding all these in the browser without relying on third-party plugins. Users of this high-end language do not have to download any software in order to view the multimedia content in e-Learning courses.


Highly Flexible & Easy to Access:

The best thing about HTML5-based courses is that they are highly flexible and easy to access. Users are able to maintain the content in a single source and provide to their audience, new visitors and precious clients as they just need to publish courses to HTML5. This way, the gyrating time will be decreased that makes large-scale implementation easily possible.


Extremely Interactive:

We all know that multimedia content like audio, video and some other important stuff play a very significant role in making any online course much interesting and engaging. So, HTML5 makes it easily possible for eLearning developers as they can develop games and other interactivities, which are mobile-friendly. There are lots of animations that are possible with HTML5.


Gives A Drag and Drop API:

HTML5 Gives A Drag and Drop API

Users of HTML5 can get a Drag and Drop API (Application Programming Interface), which is mainly used in eLearning development. You can find various eLearning developers, who are using Drag and Drop interactivity as an appraisal interactivity. It also facilitates better comprehension of the learning content.


Mobility:

One of the major benefits of HTML5 is to provide the content to mobile devices like smart-phones, iPads as it makes it very exciting plan for eLearning developers. It carries some highly exciting features like well supported by mobile browsers and more. Because of this major advantage lots of learners can take the eLearning courses anytime and anywhere on their mobile devices when they get time.


These are the top and main benefits of HTML5 for eLearning development, so eLearning developers can use this high-end language and get the benefits. Apart from these benefits, there are some disadvantages of HTML5 for eLearning development that you can find below:


Lack of Cross-Browser Compatibility:

HTML5’s developed applications are not always supporting on all the browsers, so it is one of the major drawback of HTML5. However, if you developed applications with Flash as plug-in are compatible with all the browsers and do not have any kind of compatibility issues.


Not Have Support to Legacy Browsers:

We all know that HTML5’s main commitment was to support and has compatibility with old browsers, but it is not completely supportive with the major browsers. It is also talented to only some extent like the legacy versions of the IE (Internet Explorers) are not supporting with HTML5. So, because of this issue, you can find lots of developers, who choose to go for HTML4; but HTML5 is compatible with some new and major browsers.


Restriction of Graphics and Animations:

With the help of Adobe Flash, we are able to develop rich graphics and animations, but when it comes to use HTML 5 as option, you are restricted up to some limit as it does not provide that much of flexibility as Flash. Therefore, you can find lots of developers, who are still opting for JavaScript and CSS to develop graphics and animation.

These were some of the of disadvantages of using HTML5 for developing eLearning courses, so every developer needs to understand before he starts using it for the development.

Keep visiting our blog for more information on HTML5 and its solutions as we are regularly update some useful and major information that you should know.


How Video and Canvas Elements Jointly Create Interactive Video Experiences?

Do you want to create interesting and interactive experiences? Get ready to work with the built-in goodies in HTML5 and combine them to develop the innovative experiences. In this article, we are going to take "non-interactive" mp4 video and can create how to create choose-your-own-adventure-style interactive experience through functionality of the <video> and <canvas> tags.

interactive video experience

Firstly, we have needed a video. It is advisable to start with a short, light one (about 1 minute in length). Now, you have to set up a super basic HTML file:

<!doctype html>
<html>
<head>
<title>
Making an interactive video using Javascript
</title>
</head>
<body>
</body>
</html>

Now, you have to put a pair of video tags in the body section. Here, we are giving an id of “myVideo” and assign a width and height of it. You have to add a source tag between the two video tags that defines the location of the actual file and its type.

After that, you have to add a canvas tag. Please Note: the order is not arbitrary, so if you are placing the video tag below the canvas tag in the code then canvas would be hidden behind the video and interaction with it would be blocked. Give canvas an id of “myCanvas” and give it the same width and height as the video so it overlies completely.

This thing can be done with a few simple lines of CSS. Now, you have to add a pair of <style> tags to the <head> and if you prefer, then create an external separate style sheet. Check out below given code for overlapping the two elements.

<style>
#myVideo,#myCanvas{
position:absolute;
left:0px;
top:0px;
}
</style>

With this, you can set your video and canvas in the top-left corner. If you want to move it around the screen, then you have to tweak the left and top values. Ensure to assign this to both the IDs. Here, we found the powerful transparent wrapper than watch-only video. In next step, we have to set up Javascript file by adding below give lines to the head of your HTML page:

<script src="myScript.js"></script>

In next step, you have to set up a .js file named myScript.js and paste it in the same directory as your HTML file. After that, you have to set up reference the video and the canvas in Javascript. This can be done by inserting lines to the top of myScript.js:

var canvas = document.getElementById("myCanvas");
var context = canvas.getContext("2d"); 
var video = document.getElementById("myVideo");

Now, we are creating a variable, named as canvas that accesses the HTML <canvas> element through its ID. It’s time to create a second variable that holds the context of the canvas. It will give access to many powerful tools which can be called directly through the variable context. In next step, you have to refer the video tag.

After that, you will see the both elements are fully accessible through Javascript that simply means you don’t have to access all their built-in methods and properties.

Those people, who have an idea about canvas, can easily use it to draw shapes, show images, create animations, etc. You have to draw a rectangle on the canvas by adding this simple code to the script file:

context.fillRect(100,100,50,50);

After that, you have to work with some essential methods and a very important property of the video element, namely:

video.play();
This plays the video, as you can imagine.
video.pause();
This pauses the video.
And…
video.currentTime

It gives current position of the playback that we require to give to mess around with the sequence of our video. Now, you have to create a simple, grey rectangle. But before that you have to create a generic Javascript object that helps with the collision detection later. for that, you just wrote codes given below:

var buttonObject =
 {
   width: 0,
   height: 0,
   x: 0,
   y: 0,
   centerX: function()
   {
     return this.x + (this.width / 2);
   },
   centerY: function()
   {
     return this.y + (this.height / 2);
   },
   halfWidth: function()
   {
     return this.width / 2;
   },
   halfHeight: function()
   {
     return this.height / 2;
   }
 };

After that, you use the Object.create() method and develop our actual button which will inherit the properties of the buttonObject.

var button = Object.create(buttonObject);
button.x = 200;
button.y = 200;

Now, you have to save and run it in your favorite browser and you notice that nothing happens. This is because you haven’t drawn anything yet. Now, you have to specify abstract element’s characters on the screen. You have to follow below given method to draw it,

context.fillStyle = "#333";
context.fillRect(button.x,button.y,button.width,button.height);

One will see a grey (hex value: #333) rectangle on your screen if everything went well above the video. After that, you have to add two event listeners to deal with our mouse activities.

window.addEventListener("mousemove",onMouseMove,false);
window.addEventListener("mousedown",onMouseDown,false);

Now, we have to add a variable to decide whether or not the mouse has been clicked…

var clicked = false;

after that you have to create two simple variables for tracking the X and Y values of the mouse…

var mouseX;
var mouseY;

…and let’s finish it off with their respective handlers:

function onMouseDown(event)
 {
 clicked = true;
 }
 function onMouseMove(event)                {
 mouseX = event.pageX - canvas.offsetLeft;
 mouseY = event.pageY - canvas.offsetTop;
 }

A command will be simply executed by the mousedown when the mouse button is being pressed. Along with clicked, it will let you know if we’ve clicked on button. On other side, constant update on our mouse’s X and Y position will help on the mousemove function. Below given code you have to update on collision detection to add something:

main(); 
function main() { 
window.setTimeout(main,33);
 context.clearRect(0,0,canvas.width,canvas.height);
var vx = mouseX - button.centerX();                      
var vy = mouseY - button.centerY();
var combinedHalfWidths = 1 + button.halfWidth();
var combinedHalfHeights = 1 + button.halfHeight();
 if(Math.abs(vx) < combinedHalfWidths)
 {
    if(Math.abs(vy) < combinedHalfHeights)
    {
//THE RESULT OF THE COLLISION DETECTION GOES HERE… 
 } 
} 
}

Now, you have to do some couple of things. First of all, you have to create a main loop called main() that itself recursively and repeats itself continuously thanks to the setTimeout timer. The canvas is cleared at every call and it will help you to create the illusion of motion. In next step, you have to check the collision between the mouse and the rectangle.

However, one thing is clear that if you run above as is, you will notice the grey rectangle disappears. It is due to the dust back in frame one. In order to have to it obvious, you have to add it to the main loop. Now, you have to go ahead and cut these two lines and paste it to above the collision detection check we wrote:

context.fillStyle = "#333";
context.fillRect(button.x,button.y,button.width,button.height);

Here, you will find a complete code. First the HTML files:

<!doctype html>
<html>
<head>
<title>

Use Javascript to create interactive video:

</title>
 <style>
 #myVideo,#myCanvas {
 position:absolute;
 left:0px;
 top:0px;
 }
 </style>
 <script src="myScript.js"></script>
 <video id="myVideo" width="500" height = "400"> 
 <source src="SampleVideo.mp4" type="video/mp4">
 </video>
 <canvas id="myCanvas" width ="500" height="400"> </canvas>
 </head>
 <body>
 </body>
 </html>

And here’s the JavaScript file (myScript.js):

var buttonObject =
 {
   width: 100,
   height: 100,
   x: 0,
   y: 0,
   centerX: function()
   {
     return this.x + (this.width / 2);
   },
   centerY: function()
  {
     return this.y + (this.height / 2);
   },
   halfWidth: function()
   {
     return this.width / 2;
   },
   halfHeight: function()
   {
     return this.height / 2;
   }
 };
 var canvas = document.getElementById("myCanvas");
 var context = canvas.getContext("2d");
 var video = document.getElementById("myVideo");
 var button = Object.create(buttonObject);
 button.x = 200;
 button.y = 200;
 window.addEventListener("mousemove",onMouseMove,false);
 window.addEventListener("mousedown",onMouseDown,false);
 var clicked = false;
 var mouseX;
 var mouseY;
 function onMouseDown(event)
 {
 clicked = true;
 }
 function onMouseMove(event)                {
 mouseX = event.pageX - canvas.offsetLeft;
 mouseY = event.pageY - canvas.offsetTop;
 }
 main();
 function main() {
 window.setTimeout(main,33);
 context.clearRect(0,0,canvas.width,canvas.height);
 context.fillStyle = "#333";
 context.fillRect(button.x,button.y,button.width,button.height);
 var vx = mouseX - button.centerX();                      
 var vy = mouseY - button.centerY();
 var combinedHalfWidths = 1 + button.halfWidth();
 var combinedHalfHeights = 1 + button.halfHeight();
   if(Math.abs(vx) < combinedHalfWidths)
   {
     if(Math.abs(vy) < combinedHalfHeights)
     {
    }
 //THE RESULT OF THE COLLISION DETECTION GOES HERE…
   }
 }

Now, you have to payoff for clicking on the rectangle. You have to delete the comments in the collision detection formula and add the following:

if(clicked)
 video.play();

After that, you have to run the code and check out what happens when you click on the square. Just for change, you have to change above code with below given code:

if(clicked)  {
    video.currentTime = 10;
    video.play();
    clicked = false;
 }

It will allow to skip forward or back to the 10 second mark every time you click on the box. Another example: You have to add another variable at the top under the mouseY variable:

var buttonVX = 5;

After that, you have to check back in the main loop and add code for collision detection:

video.pause();

Lastly, you have to add some basic mechanics to make the box move from the left to right:

video.play();
 button.x += buttonVX;
 if(button.x > canvas.width - button.width)
 {
 buttonVX = -5;
 }
 if(button.x < 0)
 {
 buttonVX = 5;
 }

This amazing guide helps you to create Interactive Video Experiences with Video and Canvas Elements. For more information you can contact me.


10+ CSS3 & HTML5 Tutorials That Make Website Designing A Lot Easier

The job of a web designer isn't easy, and it seems to keep getting more and more complex with each passing day. Between new web standards, new libraries and new tools, it is quite difficult to keep up.

Thankfully, there are lots of great resources obtainable that can help designers to learn various new techniques and ideas.

In this article, I have shared twelve CSS3 and HTML5 tutorial resources covering a variety of web design topics. These different tutorials can help you out in your project of designing, so let’s have a look on these twelve tutorials:


1st CSS3 Responsive Menu

This tutorial teaches you how to build a menu that is responsive, meaning it adjusts to the size of the viewport on desktop or mobile. It isn't as simple as you think, so you'll need to commit some time to understanding the mechanics and reading it carefully before adding the menu to your responsive site, safe in the knowledge that it will look just as good on your desktop website as it does on your mobile website.


2nd HTML5 Canvas Tutorial


HTML5 Canvas

Through this tutorial, one can get complete information on the fundamental drawing capabilities of the HTML5 Canvas, comprising curve and line drawing, shape drawing, images and text, path drawing, gradients, patterns and more.

However, this tutorial also contains information on what applications you can create with HTML5 Canvas, so ensure that before you came across with HTML5 Canvas, you consider this tutorial.


3rd HTML5 Form Input Elements

As we all know that the basic HTML Form Input elements includes Test, Select, Textarea, Radio Button, Checkbox and File Upload and more that served users exceptionally over the years.

If you are looking for new put of HTML5, this tutorial comes with all new input types that have some wonderful functionality built into them. Check-out this tutorial to get more information about HTML5 form Input elements and make your website more attractive.


4th HTML5 Form Input Attributes

Along with the input, HTML5 also come with lots of other attributes that can be used to modify the behavior and operation of forms. Using all new attributes and inputs, website designers are able to create forms that are smarter, simply using HTML no matter whether they have experience or not.

In this tutorial, you can find in-depth information about HTML5 Form Input Attributes that are recently introduced by the company. In short, we can say that this tutorial explains the rest of the new attributes and shows how they are useful.


5th HTML5 Geolocation


HTML5 Geolocation

We all know that there are lots of techniques obtainable when it comes to recognize the user’s location, and mainly, Wi-Fi and IP based techniques are extremely common among desktop browsers and GPS, A-GPS and Wi-Fi techniques are used by mobile browsers.

This tutorial contains huge information on HTML5 Geolocation like it can be used and how it will be helpful to provide location based information or route navigation details of the user.


6th Accordion with CSS3

You may create a fancy accordion menu using this tutorial. You may go as creative or as elegant as you wish, and the tutorial will show you how. It is a nice way of adding something a little more special to your website. So, check-out this tutorial that provides huge information about accordion with CSS3.


7th Create a Stunning Menu in CSS3

This is one of my personal favorite tutorials for creating a slick navigation menu using only CSS3. It doesn't require any JavaScript and images for decorating website as it includes a great icon font with some character to menu option.


8th HTML5/CSS3 Gray Navigation Menu


HTML5/CSS3 Gray Navigation Menu

Taking help of this tutorial, you can simply create navigation menu that has cross-browser functionality and was optimized for IE7 and above. This menu is totally created in HTML5 and CSS3 without using images.


9th Responsive Navigation Menu

This is the best tutorial on Responsive Navigation Menu as it provides information on new technique that can be used to produce a responsive menu without having to use JavaScript. Website designers can developers can get information on how menu can be aligned left, center and right, so make your website designing and developing extremely easy with this tutorial.


10th Illusion of Stacked Elements with CSS3

Many of you all are familiar with the use of the before and after pseudo elements so that you can do some interesting effects with CSS. In this tutorial, you can find information on how you can develop a simple stacked look to some images. So, go through this tutorial and get in-depth information about Illusion of Stacked Elements with CSS3.


11st HTML5 Audio player with Playlist

There are lots of people, who are facing the task of developing audio player, but some are simply selecting one of the obtainable players like flash player. But, if you are looking to develop your own audio player that works wonderfully on mobile devices, this tutorial is completely best as it allows you to get in-depth information about how to develop your own audio player.


12nd How to use HTML5's Drag and Drop?


HTML5's Drag and Drop

Using CSS3, you are able to create a tabbed navigation menu. It gives you instruction on how to create and install tabbed navigation into your website. It also includes tutorials on the additional extras such as text shadowing or box shadowing.


13th HTML5 Periodical Table


HTML5 can be sometimes overwhelming, but once you've mastered it, you can do a whole lot of stuff. That's why WebsiteSetUp.org came up with an HTML5 Periodic Table (developed by Robert Mening) to provide a visual reference to Web Developers.


So, these are 13 best and wonderful CSS3 and HTML5 tutorials that web designers can use to make their task of designing a lot easier. To get more information on HTML 5 development or CSS3 development, you can click here.


Easy Animation with 10 Worthy HTML5 Animation Tools

Want to make your websites visually stunning and creative? Every webmaster has an aim to create fantastic HTML5 animations for your websites, no matter how much it costs. However, producing such animations is a bit difficult and consuming process. Below given fantastic collection of animation tools helps developers to create HTML5 animations for your websites to make your site stunning.


1st Google Web Designer

Easy Animation with 10 Worthy HTML5 Animation Tools

Google Web Designer is the latest tool of Google that used for developing an interactive HTML5 sites and ads. This tool is a modern WYSIWYG, where developers don’t require jumping into the code, but also getting the output and tools that are design-oriented. Developer will find generated code and can simply be edited or tweaked and the result is showed automatically. Along with tool, you will find ready-to-use settings for designing Google-powered ads like AdMob, DocubleClick, and so on.

Above mentioned are 10 worthy HTML5 Animation Tools that makes your animation easy and attractive. If you have found some latest one, then let us know through comment section.


2nd TweenJS


TweenJS Animation Tool

TweenJS is one of the simplest tweening libraries that used in JavaScript. This library was created to incorporate excellent with the EaselJS library, but not dependent on or particular to it. TweenJS library supports tweening of CSS style properties and numeric object properties both. Its API is straightforward yet very powerful to develop tweens by chaining commands.


3rd Adobe Edge Animate


Adobe Edge Animate Animation Tool

Adobe Edge Animate is one of the best motion and interaction tools for producing animated, interactive content by using CSS, JavaScript and HTML. Edge Animate comes with precise control over motion graphics and HTML elements with a video-editor-like timeline interface. Content created with Edge Animate works excellent on mobile devices that run on Android or iOS and modern desktop browsers as well. This tool includes features like Down-level browser support, Multiple publishing options, Web font services support, CSS filter support, Digital publishing support and so on.


4th HTML5 Maker


HTML5 Maker Animation Tool

HTML5 Maker is an excellent animation service/tool for creating animated, interactive content with the help of HTML5, HMTL, JavaScript and CSS. It supports all the latest text filters and thus, you don’t require using Photoshop to create attractive text. Being a simple to use tools, it also gelps to achieve remarkable outcomes by creating cross-browser animated content like Slideshows, Presentations, Sliders, JavaScript and html5 animation, and so on.


5th Motion Composer

Motion Composer Animation Tool

Motion Composer is a must have tools for the professionals and prosumers as it constructs the difference between professional and novice web designers. One shouldn’t require using any code for creating animation. With the help of clear UI, you can simply create beautiful animations effortlessly. This tool publishes your created content to any smartphone, computer, tablet, etc. Furthermore, you can also integrate audio to your animation and make it more impressive.


6th Animatron


Animatron Animation Tool

Being a simple tool, Animatron can create stunning HTML5 animations and interactive content in your browser. Users can have the intuitive Animatron Editor for designing and publishing banners, movies and infographics that play everywhere, from desktop to mobile devices. Animatron doesn’t required any coding knowledge. Moreover, it enables you to team up with other users, create custom shapes, import artwork and draw directly within the tool.


7th Motion Canvas


Motion Canvas Animation Tool

Motion Canvas is a complete HTML5 Canvas animation system that enables designers to produce vivid drawings. With this tool, designers can easily design shapes, text rendering and bezier curves (pen tool) to create interactive masterpieces. Motion Canvas offers easy animation functionality and delivers industry-standard key-frame animation system. Its animation can run on iPhone, Android and Win7 phones and is compatible with Firefox8+ or IE9+.


8th Purple Animator


Purple Animator Animation Tool

Purple Animator allows creating beautiful HTML5 animations effortlessness. Created animation with Purple can be seen on mobile devices and on your Desktop. This tool imports assets directly from graphics applications such as Pixelmator, Adobe® Photoshop® and so on and starts producing once. Preview animations created with Purple on the iPad makes you apps, sites, game, more existing.


9th Nodefire


Nodefire Animation Tool

NodeFire is a commendable responsive focused HTML5 animator for sites that follows mobile, desktop, tablet devices while in design more. The best thing about this tool is it creates only one animation that responds to fit various environments. NodeFire is blessed with unparalleled animation and interaction features


10th BLYSK


Google Web Designer Animation Tool

BLYSK is considered as one of the most powerful tools for producing HTML5 animations. It is based on a timeline that makes your job much easier, just like Adobe Edge and Tumult Hype. This tool has a combined power of HTML5, CSS3 & JavaScript that delivers possibility of creating animation like old tools, but without any plug-ins. Users have to use in-cloud image library or use built-in tools for drawing anything they want without installing anything.


5 Secrets of HTML5 Responsive Design that Can Increase Your Site User Experience

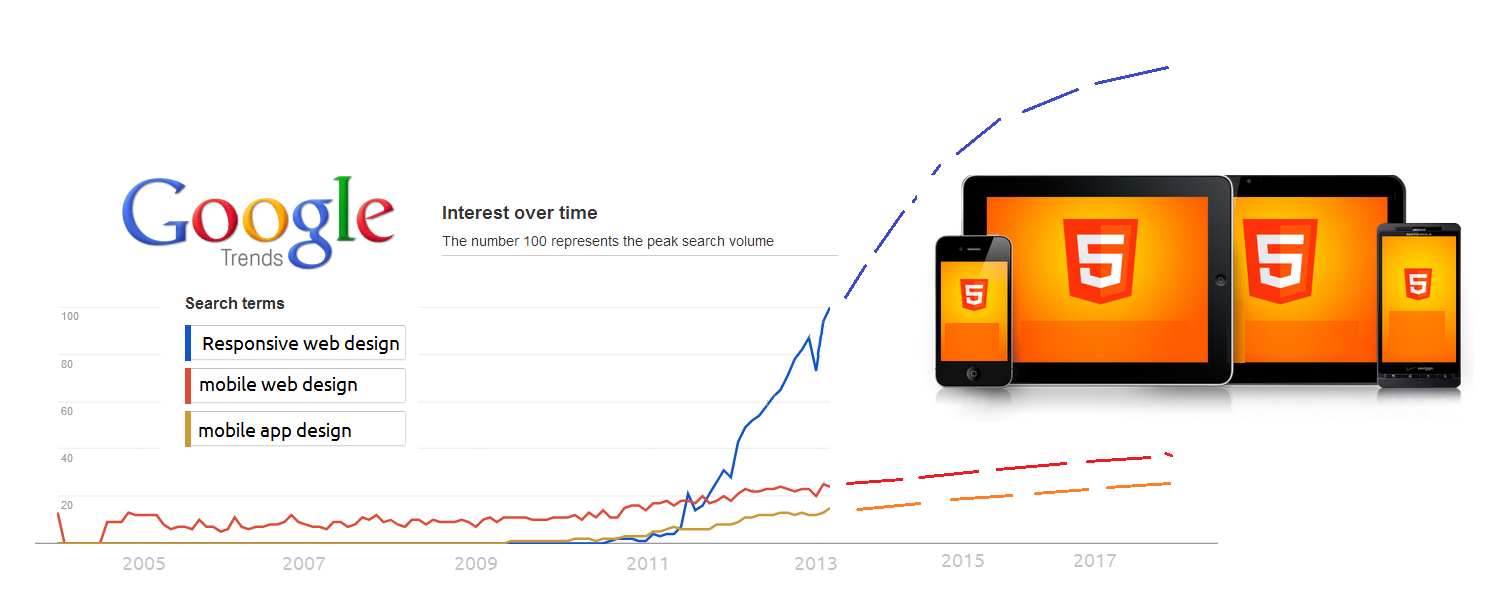
Everything is gonna responsive now, so we are here to discuss some essential yet common practices for creating responsive site layouts and experiences. In this article, we are going to discuss emerging techniques for site layouts that can be easily change according to screen size so as to make sure that users get enjoy an experience no matter what screen size users are using.

html5 responsive web design

Apart from this, one can easily see present rich media like images and how professional can make sure that small-screen device’s visitor cannot bear additional amount for high-quality media. Below are some effective ways through which you can get to know how your website looks on different devices resolutions.

One of the best ways to test your site layout in different resolutions is through Benjamin Keen’s responsive web design bookmarklet. You can also add this bookmarklet to your Favorites bar. If you have Windows 8, it would be best to use Internet Explorer 10 on your full screen mode by using the Windows 8 snap modes.

You can also use Internet Explorer 10 on the full screen or can multitask through docking the browser to snap mode, where the layout characteristics of a smart phone browser is emulated.

In addition, you can simply dock the browser into fill mode, i.e. 1024 x 768 pixels on a default Windows 8 screen size of 1366 x 768 pixels. It is one of the best proxies to know how your site will look on iPad screens and traditional 4:3 screens.


1# Media Queries

In order to recognize a user is visiting a site from a PC or a mobile device, developers have to rely on sniffing out the browser’s user-agent string. Once they get to know, developers are redirecting users to different sub-sites that are serving virtually the same content but with diverse layout and information design. Two separate engineering efforts are required for redirections.

Moreover, one can also have to optimize this approach for two screen layouts, i.e. mobile with 320-px width and desktop with 1024-px width. It doesn’t give fabulous experience to the users by visiting from transitional device sizes like tablets and users with larger screens.

Web developers also get help from CSS3 for separating content creation from the presentation of that content and also manage layout for diverse dimensions completely within CSS through the introduction of media queries.

With the help of media query, developers can easily write a CSS3 style sheet and declare styles for User Interface elements, which are conditional to the media type, screen size and other physical aspects of the screen. Moreover, one can declare different styles for the same markup with media queries by inquiring browser about important factors like device pixel density, device width and device orientation.

It also would be easy to fall into the catch of creating three diverse fixed-width layouts for markup web page to make focus on common screen dimensions today, i.e. phone, desktop and tablet. But, this is not a responsive web design or even doesn’t provide an optimal experience for all types of devices. We can say that media queries are one of the important parts of solution that delivers truly responsive web layout.


2# Can “Pixel” Means A lot?

Designers are using pixel for web design and layout. They are also referred to a single point on the user’s screen that is able of showing a red-blue-green dot. The de facto way of doing Web layout is through pixel-based Web design for announcing the dimensions of individual elements of a Web page as well as for typography.

It is must as most of the websites are using in their navigation, headers and other page UI elements and also chooses a site layout with a fixed pixel width so their image looks great.

But, another layer of meaning to this term has also been added by the recent emergence of high-pixel-density screens and retina displays.

If we are looking to the contemporary Web design, you will find single smallest point that can be rendered by the device’s screen.


3# Scaling The Site Layout Responsively

One of the most important factors of Web site design is its Grid-based layout. There are many different websites that easily visualized as a series of rectangles for page factors like site navigation, headers, content, footers, sidebars, etc.

If you are designing responsive sites using HTML5 language, you have to make the grid layout agnostic according to the user’s screen size. it simply means that one should have to manage content and layout for scaling to as much screen real estate as is available rather than giving 2-3 fixed-width layouts.


4# Design of Mobile App

We all have an idea that about 12% of website traffic comes through mobile device. This figure is significantly growing day by day with the increase in number of smart devices. Within few years, the users for smart device increases in major countries like Latin America, Asia and Africa. If you are taking a mobile-first approach to design website, it is good exercise in information design.

It is helpful for prioritizing the content and functionality that you have created for mobile version of a site and then progressively improve the site layout for big smart devices. In this way, you can have a good experience on the mobile devices apart from desktop version. Moreover, it also delivers great experience of navigation in addition to “tier-two” content.


5# Customize Form Fields

Every mobile or web site has to fill a form option, so it is must for every developer to minimize interactions especially for touch users. It is must where a lot of text inputs are available. The type attribute for the <input> tag are also extended by HTML5 that allows developers to add semantic meaning to a textbox. For e.g. the contact number can be marked up as <input type= "tel" /> while the email address as <input type= "email" />.

If we are looking to the latest browsers, it parses this optimization and attributes the layout of the touch-screen keyboard consequently. For e.g. the browser’s touch keyboard will importantly show a numpad when a user taps on a phone number field or the touch keyboard will surface the “@” key, as well as a .com key to minimize typing when they taps on the email address field. With this simple trick, one can easily enhance overall form-filling performance of mobile site that especially created for touch-screen phones and tablets.

Wrapping Text

Hope, you will like my strategies that helpful to designer for dealing the most common scenarios of responsive design like bandwidth-sensitive image scaling, handling grid-layout, and optimization of text and form fields. There are many experienced and knowledgeable web development community that are calculating techniques for solving newly arising dares in the responsive design space.

Top 5 HTML5 Mobile UI Frameworks For HTML5 Powered Apps

Increase in demand of HTML5 Mobile User Interface Frameworks results into more number of HTML5-powered Apps. HTML5 Mobile UI frameworks are nothing but libraries that help developers to develop a professional grade user experience for applications.

html5 mobile UI framework

Such libraries include one or more than one files that written using JavaScript and CSS. That means such files are meant to be included in an HTML file. In this post, we have collected 5 outstanding HTML5 Mobile UI Frameworks that help you for front-end web development. Even I think, you will have helpful tips to use app framework for developing HTML5 mobile app so found the best. Go through this post and gather essential information.


1st Kendo UI

Kendo UI Framework

Based on jQuery, Kendo UI is a commercial venture that supports the outstanding documentation and tools available for developers. Having Kendo UI’s theme builder, one can easily helps developers to cook up a custom color scheme for their UI.

HTML with class tags to run "widgets" are used in Kendo UI’s Mobile HTML5 library that delivers a set block of functionality. Using Kendo UI also allows changing its UI based on the platform for emulating the native aesthetic of an iOS, Windows Phone 8, Android, or Blackberry device. The Hybrid App builder Icenium also uses it.

● HTML based

● Native look depending on mobile platform

● Fast with SVG support, plus fallback support for older browsers

● Complete package, framework, UI and MVC all in one

● Great documentation

● Great template system, themes are native like, depending on platform (iOS, Android …)


2nd Twitter Bootstrap 3

Twitter Bootstrap 3 UI framework

Twitter Bootstrap 3 is one of the latest in a series of HTML5 UI Frameworks that works well for desktop browsers as well as mobiles. This framework is based on manipulating HTML5 elements and delivering specific CSS styles to create an application.

The Twitter Bootstrap Website also allows developers to add customized style and JavaScript components for enhancing its functionality. One of the best things about Twitter Bootstrap 3 is it contains a distinctive "Web 2.0" look for giving modern and crisp look, however, it doesn’t support JavaScript scrolling or animated transitions.

● New design and an optional theme

● Rewritten JavaScript plug-ins

● Super-powered grid system

● Brand new Customizer

● Cross-Browser Compatibility


3rd TopCoat

TopCoat UI framework

Built by Adobe, TopCoat is a free HTML5 Mobile UI framework that relies on CSS libraries over JavaScript to deliver every developer’s requirements. This framework is much stylish from others and allows easy to build using HTML5 elements that delivers an edge in speed.

Those who are a fan of Adobe’s aesthetics won’t be disappointed by TopCoat. Moreover, it’s designed primary for desktop browsers, but also has a mobile stylesheet that contains larger touch targets for controls.

● Custom builds for themes and hacks

● Free HTML5 Mobile UI framework

● Social sharing icons for all of the major networks

● Mobile Stylesheet With Larger Touch Targets


4th jQuery Mobile

jQuery Mobile UI framework

jQuery Mobile is the most commonly used HTML5 Mobile UI Framework that provides a mobile user interface, reflecting the same aesthetic and usability of its desktop product although it is not really created for the mobile space.

This HTML5 Mobile UI Framework is simple to use as it is programmed by using HTML elements just like the previous two frameworks. jQuery Mobile also blessed with a large installed base that delivers help and sample code for latest projects.

● Incorporating predesigned layout, control, and widget elements

● Easy to learn and Quick to Iterate

● Avoid App Store Approval Madness & Debug Build Hell

● Cross-platform & cross-device compatible


5th Sencha Touch

Sencha Touch UI framework

Sencha Touch is better known for its high-performance HTML5 mobile application framework that delivers high-quality user experience. Sencha Touch enables developers to develop some outstanding apps for BlackBerry, Windows Phone, iOS, Android, etc.

It delivers a unique take on HTML5 Mobile UI Frameworks as it needs all UI code written in JavaScript. Sencha Touch also supports the Yahoo Query Language and its theme supports every popular mobile platform.

● Themes for every popular mobile platform

● Model–view–controller system

● Easily scales to different resolutions for maximum compatibility

● HTML5 and CSS3 allows higher flexibility

● 50 built-in components


Other than this, there are some other mobile application HTML5 frameworks that help to create marvelous application with lots of features, but this post came to its end. If you think I forget to something, let me know through comment section. You can also share your views as well.

K6WFMSTHRFP7