Showing posts with label WordPress. Show all posts

10+ Exclusive Things That You Can Do With WordPress Easily

Since its inception, WordPress is one of the best and perfect tools for running a blog and a regular website. Because of its open architecture, this high-end CMS is much more than just a CMS as there are lots of developers worldwide, who are taking this exclusive platform to a new level.
In addition, the users of this wonderful platform can make this platform into something really more than a CMS with themes and plugins. Below, you can find 10+ exclusive things that you can do with WordPress without any hassle.

You can have a close look at what’s more possible with WordPress that will surely inspire you to make use of it in such way that you had not though earlier:

Forum


I don’t think so that anybody would have thought about WordPress as forum software. At EngineThemes, they guys have an excellent thing going on. They are capable enough of turning WordPress into a very good forum application with an exclusive theme that known as ForumEngine.

Moreover, it is a customized version of WordPress comments + posts, merged with front-end controls and easy administration. They have huge information on how to make slick designs. You can go through bbPress from the creators of WordPress if you are interested in making use of WordPress as a forum.

Directory


Directory is one such theme that you have not imagined WordPress is running the show. Popularly known as directory theme doesn’t only enable users to make attractive homepage, but it also incorporate numerous specific directory features on it’s listing pages.

Amazon Shop


When it comes to combining WordPress with WooCommerce, it makes for a wonderful eCommerce solution. But how do you feel if you can take it as a further step by adding as your supplier. The best thing is that you can begin selling without having your own stock to worry about. Just you will need is the plugin that known as Amazon Shop and an Amazon affiliate account.

Twitter Look-alike


A lot of people know this as a Twitter for WordPress, the P2 theme is the best way to allow short communication in teams as well as companies. It is the theme Automattic use themselves for internal communication.

Because of its online commenting, one can easily post on a topic by which other people can easily respond in a very convenient way. Moreover, there are not a lot of things to do, but the best thing about it is great at doing what it needs to do.

Issue Tracking


Issue Tracking is one of the best themes that called Quality Control, making best use of WordPress functionality by turning it into a wonderful quality control tool. Posts easily become problems and comments become status updates. In addition to this, the theme has an integrated ticket system that can be filtered on priority, milestone or status. Even it enables for assigning tickets to a particular user.

Coupon Website


As we all know that coupon websites are considered as one of the best ways to generate affiliate commissions, delivered you do not use shady tactics to draw in visitors. Clipper is a wonderful theme, made by AppThemes, allowing users to integrate coupon management at an advanced level.

Support Desk


You would a lot of knowledge based themes, but this theme known as SupportPress, it is easily possible for you to have you own ticketing system. Even it comes with capability to allow chat functionality. So, users of this theme can comprise documentation, an integrated forum and FAQs all in one single theme.

Classified Ads


Till today, classified ads are extremely popular, so people can find an excellent classifieds theme that known as ClassiCraft to convert WordPress into a classified ads site without any kind of hassle. Using this high-end theme, users will have the best usability, and enabling for multiple ways of monetizing your website by providing premium ads. It also enables people for showing a map next to every single listing and a contact form.

E-Commerce Site


Now, you can easily monetize your website through WooCommerce that is a fully customizable plugin and provides you the ability to keep track of incoming sales, reviews and stock levels. This is one such plugin that offers payment gateways like PayPal standard, Cash on Delivery and BACS. This plugin is also well-known for handling all your shipping requirements. Mainly, it fully takes care of your online business needs.

Social Network


You know that you can turn WordPress into a fully social networking site. This is considered as the best tool that can help you to reach your niche audience like sports team or company. One can easily do this via BuddyPress. As it allows your visitors to sign-up, post messages and create profiles.

From there, you are capable of using BuddyPress in order to communicate and interact with your audience. More than 330 BuddyPress plugins are there, so one can easily customize it in order to meet your requirements.

Clone Themes


When it comes to talking about clone themes, users can get benefit of cloning a theme which can be used if converting an old WordPress theme or integrating your blog onto an existing website. It is fact that one can be done by using a plugin like ThemeMatcher.

It is very simple to use, so users can enter the input of the address you want to copy, settle on a layout and more. Users do not have to bother about codes, CSS, images or anything.

Memberships


Membership’s plugins are some of the most popular plugins for WordPress. It is an easy to combine it with various membership levels due to WordPress’ convenient user system. There are some of the payment options to it, so you can start selling memberships.

In addition to this, this plugin named S2Member can easily protect your while website or also enable for pay-per-article. This one is obtainable for free unlike other themes.

So, these are the top 10+ things that can be easily performed with WordPress that one can easily do. Moreover, if you are looking forward to having a WordPress based website for your business, you can hire a professional WordPress developer from any trusted WordPress development company.

Ultimate Guide to Develop Your First WordPress Plugin

The best thing about WordPress is it can be customized and extended with plug-ins. Developing WordPress plug-in seems like a difficult task; however it is actually simpler than you may think. In this post, we are going to teach you how to develop WordPress plug-in with few simple steps.

ultimate guide to develop beginners' first WP plugin

Before beginning with development task, I'm providing information about what actually WordPress plug-in is. Let me tell you something:

Actually WordPress' first plugin supported version was WordPress 1.2 Mingus. And the first plugin was developed on Monday 19 April 2004 by Dean Allen. The name of that plugin was This is Textile, A Humane Web Text Generator.

Ahead, WP plugin is a PHP script that customize and extend the native functionality of WordPress. Installing flexible Plug-in API in your WordPress, you will enjoy many advantages like:

● It makes your modularity of code for a particular project increases and make updates and maintenance easier than before.

● Develop separate Plug-in functionality from themes

● Extended code base

● Allows using same plug-ins with various themes and has some design-independent functionality

● Implementing modern programming techniques, OOP is easier with a PHP script; at same time it has ability to use native WordPress functions, classes and APIs.

The main task for beginner is to first build a solid plugin foundation that meets WordPress requirements and make plug-in more recognizable. Your plug-in should follow common practices and conventions that accepted by community.


Plugin Name and Files

Firstly, you have to create a unique plug-in name. Create the brand prefix to increase the chance of a name being unique. Ensure to prefix with short reference to the plugin’s name in names of files, classes, functions, variables, etc. as it avoids conflicts with other plug-in’s name and the core as well.

Now, we are going to adopt the name Hello World Plugin and to increase the chance of uniqueness, we are going to use My Plugin converted into abbreviation MP. Now, the exact name would be MP Hello World Plugin. In next step, you have to create the plugin’s files and store them in separate folder inside a dedicated plugin folder. Now, name this folder in accordance with plugin, i.e. mp-helloworld. The main plug-in file is also included in this folder with the same name: mp-helloworld.php.

It is also recommended to use a readme.txt file by WordPress Codex as this file has detailed information about your plugin in a standardized format. It is must to have readme.txt, if you are going to submit your plugin to the WordPress repository. Don’t think that it is burden for you; it provides you many advantages as well. Moreover, if you’re plug-in have many files or load some assets like images, css and js files then it should be managed in sub-folders. You can organize file like this way:

File Structure

Plugin Header

Every plug-in must have header. Having header helps you to organize the script as a valid plugin and provide output proper information on the plugins’ management screen. One can find header, which is a PHP comment block, at the top of the main plugin’s file:

/*
Plugin Name: MP Hello World
Description: Create hello world message
Version: 1.0
Author: Author's name
Author URI: http://authorsite.com/
Plugin URI: http://authorsite.com/mp-helloworld
*/

One can see the header’s information in the corresponding plugin’s row on the management screen.

Plugin Screen

No matter you lines are in order to not, ensure to have in UTF-8 encoding. It is essential to be consistent with the version numbering pattern that you have selected for the WordPress upgrade mechanism to perceive it accurately.


Paths to Files

In next step, we have to decide the correct paths (or URLs) inside the plug-in code. It is clear that paths to plugin files should not be hardcoded as the wp-content folder but could be moved from its default location and it should be detected. plugin_dir_path and plugin_dir_url are the two WordPress funcations that address the issue. However, we can move further by using various tricks:

define('MP_HELLOWORLD_DIR', plugin_dir_path(__FILE__));
define('MP_HELLOWORLD_URL', plugin_dir_url(__FILE__));

One can easily detect the path and URL of the plugin’s folder with this little snippet inside the WordPress installation and can also assign them to suitable constants. Then, we are going to use these constants with known relative paths to sub-folders, for example MP_HELLOWORLD_DIR.'assets/img/image.jpg'. One can easily add plugin files from sub-folders inside the main file by using these constants:

function mp_helloworld_load(){
  
    if(is_admin()) //load admin files only in admin
        require_once(MP_HELLOWORLD_DIR.'includes/admin.php');
        
    require_once(MP_HELLOWORLD_DIR.'includes/core.php');
}
mp_helloworld_load();

Plugin States

In this state, plug-in could be in an active or inactive state after installation. Active states mean that it was activated by the user and its code will be implemented by WordPress every time a page is requested.

In case, the plug-in could be deactivated by the users that means the files are kept in their place, but the codes isn’t implemented. In these states, changes can be caught by WP and can also implement some code planned for such changes. If any code is scheduled for activation or deactivation then it will be executed instantly without loading page.

One can register a so-called activation hook and deactivation hook for activation and deactivation actions. It is just a code that allows WP to implement one particular function on activation and another on deactivation. Below given is an example of such code:

register_activation_hook(__FILE__, 'mp_helloworld_activation');
register_deactivation_hook(__FILE__, 'mp_helloworld_deactivation');

function mp_helloworld_activation() {
    
 //actions to perform once on plugin activation go here   
}

function mp_helloworld_deactivation() {    
 // actions to perform once on plugin deactivation go here     
}

If you want to uninstall actions then you can with two alternatives. Firstly, you have to create a uninstall.php file in the plugin’s folder and add all required code. Once you uninstall.php exists, WP automatically will perform it when the plugin is deleted by the user.

Secondly, you can register an uninstall hook like we did with the activation and deactivation hooks. The difficult part is to call it only once on activation like:

register_activation_hook(__FILE__, 'mp_helloworld_activation');

function mp_helloworld_activation() {
    
    //actions to perform once on plugin activation go here    
     
    //register uninstaller
    register_uninstall_hook(__FILE__, 'mp_helloworld_uninstall');
}

function mp_helloworld_uninstall(){
    
    //actions to perform once on plugin uninstall go here     
}

Keep in mind that only one alternative will work. If uninstall.php exists, it will be performed and any uninstall hook will not be fired. Before moving further, you have to keep some important points in your mind.

It is advisable to develop plug-in with debugging. One can find huge information about the WP debugging mode and different plug-ins as well to get additional notifications. It becomes your relievable assistants to make error-free and up-to-date code.

Following WordPress Coding Standards helps to make maintain the consistency of the core code within your plugin. For common task, you can use APIs, core functions, and classes. Different types of tools for commonly required operations are provided by WordPress to developers so they can deliberate on the truly unique functionality of your plug-in.

Now, we are going to know the concept of hooks, actions, and filters. Let’s know about hooks in details, it is specially marked place in the code, where one can deliberately registered hooked into functions to define registration. There are two different types of hooks in WP, i.e. Action hook that makes the place to execute an action and Filter hook that marks the place to apply a modification to a value so the code will utilize the adjusted value.

Let’s move to the details and see the common logic of the WordPress actions. You have to mark the place, where the custom code should go with an action hook and its parameters. Now, you have to create the action function that performs the new code using parameters offered by the hook.

Register the action (#2) to be executed when the hook (#1) is fired with some main concern. At the time when the requested page is loaded by WordPress and finds the hooks, then it will search for all functions hooked into it and carry out them one by one appropriate to their priority. One can have to perform do_action function to perform task #1:

do_action($tag, $arg_1, $arg_2, ... , $arg_n);

Following parameters like tag – the hook name, $arg_1, $arg_2, … , $arg_n, etc. are accepted. WordPress itself using a lot of predefined hooks like:

do_action( 'init' );

Being a very straightforward case, one shouldn’t have to have to add extra parameters. When the most of WordPress is set up, this hook is fired and at that time, custom objects, like custom post type, etc. should be registered.

do_action('save_post', $post_id, $post);

When post is saved, the hook is fired and provides two additional parameters to operate with post_id and post object containing all the data from the saved post. However developing hooks is not a privilege of the core team. Every developers have to create a custom hook for the plug-in or theme.

All thanks to this as it provides more power like theme frameworks allow child themes to change the style and also the markup of parents without overwriting whole files.

do_action( 'my_truly_custom_hook' );

One can have to register the latest for the execution with add_action when he/she create a proper hook and created a custom function for it.

add_action($tag, $function_to_add, $priority, $accepted_args_number);

The two obligatory parameters are accepted by the add_action method, i.e. $tag: the name of the proper hook and $function_to_add: the name of the function that should be performed. In this case, the two parameters are optional: $priority: an integer to specify for registering the functions (by default, 10), $accepted_args_number: number of arguments that the registered function is going to accept (by default, 1). Look at the example for better understanding. We have use the wp_footer hook as it is a part of obligatory footer code that every theme should include.

function mp_helloworld_footer_notice(){        
      echo "<div id='mp-helloworld-notice'>Hello, I'm your custom notice</div>";
}
add_action('wp_footer', 'mp_helloworld_footer_notice');

With this example, you will understand the prefixed function that that simply outputs the notice’s markup and after that, hooked it into the wp_footer. Once you will add this code in your plug-in file, you will see the result on the site.

custom notice

Working with Filters

In this step, you have to filters operated with same logic as actions. However, you just don’t have to perform some piece of coding in a certain place. Execution of code is done just TO MODIFY some value given to them by the hook. That simply means you will find every filter hook connected with the associated value.

This value should be taken by the function that executes this value and after that, it returns it for further usage. We have seen that the syntax of functions responsible for filters and hooks are bit different.

apply_filters($tag, $value_to_filter, $arg_1, $arg_2, ... , $arg_n);

A filter hook with $tag name and the obligatory parameter $value_to_filter is created by the function apply_filter. Other arguments are discretionary and work the same ways as for actions.

filter_function($value_to_filter, $arg_1, $arg_2, ... , $arg_n){
       //filtering code goes here
       return $value_to_filter; //value has to be returned back
}

According to the skeleton of filter function, it should be accept at least one argument, the value for modification; and return the value at the end.

add_filter($tag, $function_to_add, $priority, $accepted_args);

A function with a name given as the $function_to_add argument for the $tag filter hook is registered by add_filter. We have seen the optional arguments like $accepted_args and $priority work in the same ways as for action hooks.

Let’s show the whole procedure in action: a common plug-in is to add some content at the end of a post. One can find below given filter hook, if we look closer at the the_content template tag that used to output a post’s content in a theme

$content = apply_filters('the_content', $content);
With this hook, one can add something at the end of the post in the following way: 
function mp_helloworld_post_footer($content) {         
        $content .= "<div class='mp-helloworld-post-footer'><p>Hello, I'm your custom post footer</p></div>";
        return $content;
}
add_filter('the_content', 'mp_helloworld_post_footer', 100);
Note:

We are using quite large number for priority that makes sure us to all default filters have been applied before our mp_helloworld_post_footer. One should see below given result on the site after including the code in the plugin’s file.

Post Footer

How to Find Hooks

One should need to know that what hooks are available as it is obvious to implement action and filter functionality. An Action Reference is provided by the WordPress Codex with most of action hooks fired on typical page load and a Filter Reference with a list of commonly used filters. With the help of these references, one can simply understand the order of actions and logic of filters so one can able to select where and when functionality can and should be injected.

Then, you are ready for the trip into the source code and just execute a search through the WordPress files for the do_action and apply_filters keywords in order to search the needed hook. Having information about WordPress query logic helps you work out where some hooks can be searched for. At last, one can have to refer the WordPress Hooks Database that has full information about the hooks in the core files.


Advanced Operations with Hooks

Actions and filters can also be removed with a similar syntax no doubt it has being added to your plug-in. If you want to remove action, you have to follow below given manner.

remove_action($tag, $function_to_remove, $priority, $accepted_args);
remove_all_actions($tag, $priority);

A particular action registered for a particular hook is removed by remove_action and with remove_all_actions, one can remove all actions registered with a certain hook with a given precedence. One can have heard about a popular security recommendation that helps to hide the WordPress version from the head section of the site. It is a job for remove_action. Firstly, you have to search out the hooks the wp_generator function to print the version information by browsing default filters. Below given thing can be done by code like this:

add_action('wp_head', 'wp_generator');

You have to add the opposite function in your plug-in to eliminate the effect of this code.

remove_action('wp_head', 'wp_generator');

In same way, Filters can be removed.

remove_filter($tag, $function_to_remove, $priority, $accepted_args);
remove_all_filters($tag, $priority);

Developers will get the Plugin API with a way to detect whether the particular hook has registered functions to perform:

has_action($tag, $function_to_check);
has_filter($tag, $function_to_check);

With both of the function, one can check whether a particular action or filter is registered for a hook and returns: false on failure and true on success. One can have to check ability inside the hooked function in the following way:

if('hook_to_check_name' === current_filter()){
    //do stuff related to 'hook_to_check_name' hook
}

The current_filter works with filters and actions as well. It is advisable to refer Codex for the full set of Plugin API functions.


Real-world Case

Now, let’s open plug-in skeleton that you have created. Now, we are going to add the core.php file with the code that helps to solve a task with actions and filters. In this step, you have to create a custom taxonomy that handles the guest author’s name and short author’s bio. So, any author can provide you a guest article after registering at your site. Moreover, this also ensures you provide credit to the actual author.

For this, you have to assign author’s names as any other taxonomy’s terms to the post. Now, it becomes possible to get an result from an box right after the post’s text. See the code below.

/** Hook plugin's action and filters **/
function mp_helloworld_init(){
    
    add_action('init', 'mp_helloworld_taxonomies');
    add_filter('the_content', 'mp_helloworld_author_block_filter');
    add_filter('post_class', 'mp_helloworld_post_class');
    
}
add_action('plugins_loaded', 'mp_helloworld_init');

/** Register custom taxonomy **/
function mp_helloworld_taxonomies(){
    
    $args = array(
        'labels' => array(
            'name'          => 'Guest authors',
            'singular_name' => 'Guest author'
        ),        
        'show_in_nav_menus' => false        
    );
    
    register_taxonomy('gauthor', array('post'), $args);
    
}

/** Create author's box markup **/
function mp_helloworld_author_block(){
    global $post;
    
    $author_terms = wp_get_object_terms($post->ID, 'gauthor');
    if(empty($author_terms))
        return;
    
    $name = stripslashes($author_terms[0]->name);
    $url = esc_url(get_term_link($author_terms[0]));
    $desc = wp_filter_post_kses($author_terms[0]->description);
    
    $out = "<div class='gauthor-info'>";
    $out .= "<h5>This is a guest post by <a href='{$url}'>{$name}</a></h5>";
    $out .= "<div class='gauthor-desc'>{$desc}</div></div>";

    return $out;
}

/** Add author's box to the end of the post **/
function mp_helloworld_author_block_filter($content){
    
    if(is_single())
        $content .= mp_helloworld_author_block();
        
    return $content;
}

/** Add custom CSS class to the post's container **/
function mp_helloworld_post_class($post_class){
    global $post;
    
    $author_terms = wp_get_object_terms($post->ID, 'gauthor');
    if(!empty($author_terms)){
        $post_class[] = 'gauthor';
    }
    
    return $post_class;
}

It is recommended to apply an action to register a custom taxonomy to the init hook. So in next step, you can create the template tag, which is responsible for the author box’s markup using native WordPress functions such as wp_get_object_terms.

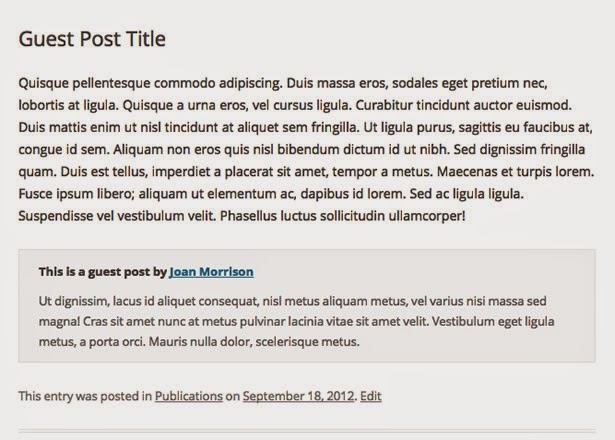
Now, you have to attach this box at the end of post content by using the_content filter hook. Lastly, we have to add the custom CSS class for the guest posts’ container that makes flexibility in the style of the theme. After applying some style, you will see outcome like:

Guest Author

Options API

The Options API is one of the consistent ways of storing data in the database. Under a given custom name, all the data is saved in the wp_options table and can be accessed through from somewhere in the code. Below given is the most essential function of the API.

<?php get_option('opting_name'); ?>
<?php update_option('option_name', $new_value); ?>

One can find the get_option function from the database and you can have any information stored under a given name and returns it. An option name is taken by the function update_option and its value and updates the matching entry in the database. It you don’t find any entry then it will make automatically. One can operate both the function with arrays as well as single values. That simply means, you can store array of data under a single name in the database and serialization and mineralization actions will be handled by the API on behalf of you. It is recommended to store plug-ins as an array under a single name.


Plugin Options’ Page

Now, you have to create a settings page or group of pages in the admin menu for your plugin. For creating a group of pages, you have to add a top level page first:

<?php add_menu_page( $page_title, $menu_title, $capability, $menu_slug, $output_function, $icon_url, $position ); ?>

We find the parameter values are self-explanatory, but it can be referred to the source for details. Now, one can have to add internal pages one by one in the following manner:

<?php add_submenu_page( $parent_slug, $page_title, $menu_title, $capability, $menu_slug, $function ); ?>

One can have to use the ID of the top level page as a $parent_slug parameter. Moreover, in the case of custom top level, you have provided the value as $menu_slug upon registration. One can create a single page under one of existing top-level sections, if he/she didn’t need several pages. For that you have to use Settings options-general.php should be used as the $parent_slug. On other side, you can add shortcut functions for adding subpages under certain admin menu items it’s add_options_page in Setting option.


Settings API

An interface is created in the Settings API that allows managing the plugin’s settings. You have to mark a page as a settings page in order to process input automatically and also output sections on the page and fields inside each section for accepting user input. Now, you have to develop section-fields structure to attain that the first goal is to register settings with the system.

<?php register_setting($option_group, $option_name, $sanitise_callback); ?>
<?php add_settings_section( $id, $title, $callback, $page ); ?>
<?php add_settings_field( $id, $title, $callback, $page, $section, $args ); ?>

It is advisable to refer the Codex for a detailed description of the parameters; however the logic is bit simpler. Firstly, you have to register options name and then, have to register section(s) with set of fields for each section and an internal ID. Through API, you can have ability to specify custom callbacks for input validation and showing each field and section.

Once, you have to complete registration of options and corresponding fields then you have to display them on the settings page with below given function that called inside the <form> tag:

<?php settings_fields($option_group); ?>
<?php do_settings_sections($page); ?>

With the settings_fields function, you can obligatory hidden fields for the native WordPress alternatives mechanism to work. Actually, the do_settings_sections outputs previously registered sections and fields.


Security Considerations

One can only have to clean the input, escape the output and take care of capabilities when dealing with fundamental security rule. One can also have to escape to output special characters, particularly HTML when showing data extracted from the database. Native functions are provided by both the tasks by WordPress that can be used in different contexts. For more information, you can visit here.

The users’ permissions are another point of concern. WordPress has integral mechanism controlling users’ roles and capabilities that blocks access to particular admin areas for users with limited permissions. Only admin can access anything he/she wants to. At the time of developing options pages, one can have to allocate correct capabilities, generally, it is manage_options. Additionally, it doesn’t allow users with low privileges to access the page. If you want to know more information about WordPress roles and capabilities, refer Codex.


Put it All into Work

Now, we are going to see the whole scenario in action. We are going to create Hello World example that shows information about guest author under a post through custom taxonomy. Previously, we found hard code into the plug-in by author’s block markup. But now, we are providing an ability to users to specify a template for that markup using placeholders for author-specific data (name, url and description). We have two includable PHP files, i.e. core.php (containing the main code) and admin.php (containing admin-related code). What changes we need to create?

Create a plugin options page (in admin.php)
/* register menu item */
function mp_helloworld_admin_menu_setup(){
add_submenu_page(
 'options-general.php',
 'Helloworld Settings',
 'Helloworld',
 'manage_options',
 'mp_helloworld',
 'mp_helloworld_admin_page_screen'
 );
}
add_action('admin_menu', 'mp_helloworld_admin_menu_setup'); //menu setup

/* display page content */
function mp_helloworld_admin_page_screen() {
 global $submenu;
// access page settings 
 $page_data = array();
 foreach($submenu['options-general.php'] as $i => $menu_item) {
 if($submenu['options-general.php'][$i][2] == 'mp_helloworld')
 $page_data = $submenu['options-general.php'][$i];
 }

// output 
?>
<div class="wrap">
<?php screen_icon();?>
<h2><?php echo $page_data[3];?></h2>
<form id="mp_helloworld_options" action="options.php" method="post">
<?php
settings_fields('mp_helloworld_options');
do_settings_sections('mp_helloworld'); 
submit_button('Save options', 'primary', 'mp_helloworld_options_submit');
?>
 </form>
</div>
<?php
}
/* settings link in plugin management screen */
function mp_helloworld_settings_link($actions, $file) {
if(false !== strpos($file, 'mp-helloworld'))
 $actions['settings'] = '<a href="options-general.php?page=mp_helloworld">Settings</a>';
return $actions;
}
add_filter('plugin_action_links', 'mp_helloworld_settings_link', 2, 2);

In the next step, you have to create a subpage under the Settings menu in the snippet mp_helloworld_admin_menu_setup. After that, one can have to output the settings form with mp_helloworld_admin_page_screen. The Settings API functions are used by it for fields and for other elements, pre-built WordPress functions are to be used.

It is noted that the action attribute of the <form > tag should point to options.php to process options suitably. Lastly, a shortcut link to the options page on the plugin management screen is created by mp_helloworld_settings_link filter.

page link highlighted

Register plugin options with the system and create fields and rules for them
/* register settings */
function mp_helloworld_settings_init(){

register_setting(
 'mp_helloworld_options',
 'mp_helloworld_options',
 'mp_helloworld_options_validate'
 );

add_settings_section(
 'mp_helloworld_authorbox',
 'Author\'s box', 
 'mp_helloworld_authorbox_desc',
 'mp_helloworld'
 );

add_settings_field(
 'mp_helloworld_authorbox_template',
 'Template', 
 'mp_helloworld_authorbox_field',
 'mp_helloworld',
 'mp_helloworld_authorbox'
 );
}

add_action('admin_init', 'mp_helloworld_settings_init');

/* validate input */
function mp_helloworld_options_validate($input){
 global $allowedposttags, $allowedrichhtml;
if(isset($input['authorbox_template']))
 $input['authorbox_template'] = wp_kses_post($input['authorbox_template']);
return $input;
}

/* description text */
function mp_helloworld_authorbox_desc(){
echo "<p>Enter the template markup for author box using placeholders: [gauthor_name], [gauthor_url], [gauthor_desc] for name, URL and description of author correspondingly.</p>";
}

/* filed output */
function mp_helloworld_authorbox_field() {
 $options = get_option('mp_helloworld_options');
 $authorbox = (isset($options['authorbox_template'])) ? $options['authorbox_template'] : '';
 $authorbox = esc_textarea($authorbox); //sanitise output
?>
 <textarea id="authorbox_template" name="mp_helloworld_options[authorbox_template]" cols="50" rows="5" class="large-text code">
 <?php echo $authorbox;?>
 </textarea>
<?php
}

It should be pointed out the all plug-in should be stored as an array. Regardless of you only have one option (authorbox_template) that we have to add in an array and the corresponding field into the section for display purposes. The ‘admin_init’ hook should execute the registration function mp_helloworld_settings_init. Moreover, mp_helloworld_options_validate function pay attention of user input by cleaning it with the native wp_kses_post filter that relies on the KSES library.

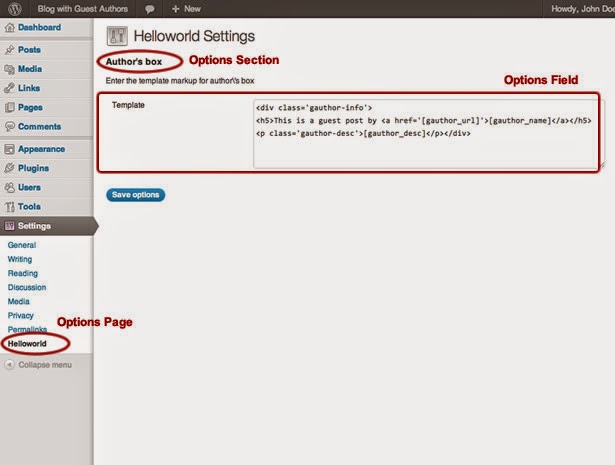
A description for the form’s section and mp_helloworld_authorbox_field outputs a textarea is created by mp_helloworld_authorbox_desc function to handle inputted markup. It is noted that the CSS classes large-text code is assigned to built-in admin styling is applied. All such create below given screen in the WordPress admin panel.

option form


Modify the function that outputs author’s box (in core.php)

We are doing so as to get the template from the database and replaces placeholder data ([gauthor_name], [gauthor_desc]), [gauthor_url], with the corresponding values.

/* Create author's box markup */
function mp_helloworld_author_block(){
 global $post;

$author_terms = wp_get_object_terms($post->ID, 'gauthor');
 if(empty($author_terms))
 return;

$name = stripslashes($author_terms[0]->name);
 $url = esc_url(get_term_link($author_terms[0]));
 $desc = wp_filter_post_kses($author_terms[0]->description);

//get template from option
 $options = get_option('mp_helloworld_options');
 $out = (isset($options['authorbox_template'])) ? $options['authorbox_template'] : '';

$out = str_replace(
 array('[gauthor_url]', '[gauthor_name]', '[gauthor_desc]'),
 array($url, $name, $desc),
 $out
 );

return $out;
}

Lastly, you will see plugin that creates a nice guest author’s box under post content.

Guest Author Box

Wrapping Text

One can have to implement loads of plug-ins to store and access option data. However, with this option, you can deliver the ability to tune the plug-in according to your user’s needs. Hope this guide will be useful for you. If you have any questions through development task, let us know through comments.

Picture: Bjarne Winkler/Flickr

Get Rid of WordPress Security Risks Once and For All

Around the world, WordPress, a highly popular blog and content management system, is widely deployed platform because of its powerful features and excellent performance.

On the web, there are lots of popular sites, which powered by WordPress platform due to its immense popularity that made it a target for attackers.

get rid of wordpress security

If you are also a businessman and wanted to develop a website that based on WordPress, you can directly set up and host a website with WordPress.com.

However, many of you all think that what about its security risks that you can face while running your website, but no need to worry as there are lots of simple yet easy steps to eliminate WordPress security risks.

So, here I have shared 5 simple steps that you can follow to eliminate WordPress security risks:

First: Make Sure to Keep Your Server Software Updated

Running a website on the WordPress platform is not a rocket science as any inexperienced businessman can also run his website on the WordPress, but he only needs to make sure to keep his server software updated. If he is self-hosting WordPress on his own server, it is essential for him to keep the core server software updated like Web server, MySQL applications, the operating system, PHP and more.

Second: Allow Automatic WordPress Updates

Since the 3.7 update in October 2013, all the major versions of WordPress can be allowed to automatically update the WordPress application so that it fixes important bug and security. It doesn’t matter what type of business you are running, but it is crucial to allow automatic WordPress updates to get updates automatically. Here I love to share a very good news i.e. WordPress 4.0 Beta 2 is Now Available, you know?

Third: Remember To Update All Plug-Ins and Themes

To decrease security risks in your WordPress website, you need to remember to update all the plug-ins and themes that you have. If you only prefer to keep the server and WordPress updated, it will be not enough, so make sure to update the plug-ins and themes too. As compare to other platforms, WordPress is an easy to access and offers full visibility into items, which must be updated.

Fourth: Owners Can Make Use of Secure Sockets Layer

For eliminating the secure risks in WordPress platform, you can use secure socket layers to log-in. Moreover, it is also essential that have you configure the WordPress administrator log-in page in order to be accessible through HTTPS/SSL? If not, then you should because administrator’s password is being sent in the clear and can be cached easily by attacker.

Fifth: Using Two-Factor Authentication is Also Best

Last, but not least is using two factor authentication is also best for decreasing the security risk in WordPress. All the WordPress users can opt for two-factor authentication for both WordPress.com and self-hosted websites. It is one such facility that requires a second password to log into the website, offering some extra measure of security.

So, these are five simple steps to get rid of WordPress security risks. If we have missed any point, you can feel free to share it with us.

However, if you want to get support from WordPress developer for discussing your any query, you can contact here.

6 WP Plugins that Can be Used with Closed Eyes For SEO Achievements

Are you using WordPress to run your website? If yes, it is the best platform among others as it gives an ability to extend the functionality of your WordPress installation with the use of plugins. Today, WordPress users can find plethora of WordPress plugins that can extend the features and functionalities of your site and make it more powerful.


top 6 wp plugins

Moreover, you can find 35000+ plugins today in the market and each plugin has its own features to offer; therefore, it is essential for you to make use of only those plugins that give your desired results. If you want to boost SEO of your WordPress website, you need to make use of WordPress plugins that enhance SEO of your site.

Here in this blog, I have listed 5+ advanced and most powerful WordPress plugins that are known for boosting SEO of your website.


1. Widget Logic

Widget Logic is one such WP plugin that works wonderfully with your widgets. Users of this plugin can get an extra option into each widget, where they can easily define where widget should/should not appear.

It allows you to get control over pages that widgets will appear on, so make use of this plugin that works exceptionally with widgets of your site. While using this plugin, users need to make sure that they are confident with using some PHP code because wrong use of it can lead to some problems.


2. All in One SEO Pack

When it comes to All in One SEO Pack, it is the most powerful SEO plugin that known for making lots of things done. Using this WordPress plugin, users can do things like optimizing tags, making sure keyword density and more. The best part of this plugin is that it does everything automatically without needing user’s side. So, WordPress platform users need to use this plugin in order to boost of their site.


3. Simple URLs

Simple URLs is another best SEO WP plugin that is a complete URL management system. It enables users to develop, manage and track outbound links form their website with the help of custom post types and 301 redirects. In short, it is highly advanced plugin that works best for your site.


4. SEO Content Control

Being a highly wonderful SEO plugin, SEO content control goes through all of your content and highlights all those pieces that are weak in terms of SEO. Using this plugin, it becomes easy to check your content and make changes in it to allow the page to get ranked quickly. Moreover, it also helps you out in understanding what you should consider while developing future content.


5. WordPress SEO by Yoast

With the help of WordPress SEO by Yoast, WordPress users can boost their site’s SEO as it helps them to write better content and have a fully optimized site that they are looking for. According to me, it is highly essential plugin for your website, so make sure to download it and enjoy its easiness of using.


6. Use Google Libraries

It is highly powerful yet effective WP plugin that known for alternating JavaScript libraries that called locally on your own server with Google’s own CDN. This is one such plugin that saves on bandwidth, so users should use this plugin to compressed versions of the scripts and boost the chance that a user already has such files cached.


So, these are advanced WordPress SEO plugins that can help WP users to boost the SEO of their website without any hassle. Moreover, businesses can also get their own plugin that has their desired features and functionalities, but they need to hire a professional WordPress developer to get WordPress plugin development service.

Summary: Want to boost SEO of your WordPress website? If yes, you need to make use of WP plugins that are especially designed to enhance SEO of your site. In this blog, you can find 5+ powerful WordPress plugins that you can use and improve SEO of your website.


WordPress Multisite – A Simple Guide for Beginners to Follow

Today, WordPress is the most popular and powerful publishing platform with more than 8 million websites worldwide using this platform as Content Management System (CMS), according to BuiltWith.com. It is one such platform that adopted by lots of businesses worldwide to make their website exceptional for their visitors.


Moreover, the increasing popularity of this platform crosses over the other CMS like Drupal and Joomla as per the Google Trends. Day-by-day, the platform is gaining huge popularity as it offers range of features, including easy to use, active development, great community support, lots of pulgins with wonderful functionality, numerous themes and more.

However, one of the best features of this platform is its ability to develop multiple websites with one WordPress installation. WordPress multisite facility is not something that most of the users know about it, but it is worth getting the information to determine whether it is right for your website as well. Here, you can a complete guide on WordPress multisite, so interested users can follow this guide and know what multisite can do:

An Introduction to WordPress Multisite

WordPress multisite is a feature or we can say mode within WordPress, allowing users to develop a network of multiple websites that all run on a single installation of WordPress. Previosly, WordPress multisite was completely separate version of WordPress that known as WordPress MU.

Then, with the launch of WordPress 3.0, the company introduced a major feature WordPress multisite as WordPress MU was amalgamated with regular WordPress and it is renamed “WordPress Multisite”. Currently, it is one such feature that can be turned off or on.

Some Examples of Appropriate Uses

There are lots of WordPress users, who do not know when to use this feature, so one of the best ways to illustrate this by considering some real-world examples:

WordPress.com – Possibly, one of the best uses of WordPress multisite is WordPress.com as it hosts blogging service where users can easily and quickly develop their own personal blog. At WordPress.com, each developed blog is another website that added to the big multisite network.

Edublogs.org – WordPress multisite is open to the public, but very limited to education purposes. This is one such company that runs wpmu.org and wpmudev.org. And it is the second biggest WordPress multisite example on the web.

TeachForUs – Being a blogging network for Teach For America, Teach For Us is the best example of WordPress multisite as teachers and alumni of Teach For America can easily develop their own blogs to share ideas within the organization and with the public.

Advantages of Using WordPress Multi site

Using WordPress multisite is completely best for businesses as it offers a complete range of benefits to them. To know what type of benefits you can enjoy, let’s go ahead:

- Unlimited site-creation for one user

- Users still have the ability to place things like menus, headers, widgets, backgrounds onto their websites and more.

- Automatic site/blog creation for any user

- Websites can be completely separate from each other or they can be integrated in different ways

- Limit the amount of uploads.

- Activating themes on a site-by-site basis.

- Different themes on different parts of your websiteUsers are allowed to develop and manage multiple sites For limited set of users, automatic blog creation for instance email or with a special code.

Disadvantages of using WordPress Multisite

- WordPress multisite’s some plugins might not always work wonderfully.

- Users of this feature need to access to their server – must be able to edit core WordPress files.

- There are some themes that are not working well with multisite.

- All the websites in your network may be affected if you have any problem with the core installation.

- The admin of it needs to learn how to manage the network that is little more involved than a regular WordPress install.

What’s the Difference?

Many of you all may have used WordPress, but do not use WordPress Multisite so it is most likely that what’s the different between in these two? Let’s have a look on main differences:

Network Admin – Along with the dashboard for single individual website on a WordPress multisite network, there is another admin dashboard that called the network admin. It is one such place, where one needs to manage settings on a network-wide basis and only super administrators can access this area.

Themes as well as plugins – Another essential difference between WordPress as well as WordPress multisite is themes and plugins like how they are managed. When it comes to WordPress multisite, plugins and themes are installed in the network admin and are obtainable for use across any website in the network. Mainly, there are two ways to activate a plugin or theme – first you can network activate a plugin or network enables a theme at the network admin level. As it makes the plugin active and make the theme obtainable for use across every website in the network.

Set-up & Installation

In WordPress, WordPress multisite is just a mode that can be enabled or disabled as per the choice; however, it is not as easy as it sounds. For setting-up, you need to follow below steps:

First, you need to read the documentation in the WordPress Codex on developing a Network as it offers complete guide instructions for setting up Wordpress multisite.

You will want to be sure your web server is capable of running WordPress multisite before you start. To users, a shared-hosting account is not recommended as multisite needs more server resources compare to typical WordPress website. It is good idea to check with your host beforehand as some hosts don’t support WordPress multisite.

In order to start with setting-up Wordpress multisite, the codex instructs users to drop a snippet of code in wp-config.php that allows the network setup screen.

It is one such point the on-screen instructions shows in the Network setup screen and continuing to follow along with the step-by-step guide in the Codex.

While going this process, you have to make decision to use subdomains or sub-directories for single developed website on your network.

Your WordPress multisite network is up and running and ready to add websites within some minutes after you follow the instructions that provided in the Codex.

So, what’s your plan to use WordPress multisite? You can share your experience and let us know whether this guide helps you out or not. However, you can also contacts Experts for WordPress website development or any other support for WordPress.


4 Simple Steps to Develop a WordPress Child Theme

Recently, a WordPress Themes Survey has been conducted, and it comes to know that more than 85% of customers are customizing their themes, and only 35% of customers are using a child theme. Because of the less information and understanding about a child theme or difficulty of creating one, very less customers are making use of it.

When it comes to developing a child theme, it enables people to make their desired changes to their website without trying their hands on original theme’s code. Child theme can make it extremely easy for you to update your website without any risk of wiping out changes while you update.

Moreover, this type of theme comes with the functionality of its parent, and the best thing about it is that users can turn off their child theme and fall back on the parent theme any time. If you have decided to develop a WordPress child theme, below mentioned 4 simple steps are completely best that you can follow to customize your wordPress theme with child theme.


First – Get Started

One of the first major things that you need to do is develop a new folder in out themes directory in order to hold the child theme. With the help of cPanel or through FTP, one can easily do it. The themes directory is wp-content/themes.

Make sure to give the name to the folder without any space in the name. Well, it is quite common to use the name of the parent theme folder with “child” added on the end. After it, you have to create a file called style .css and it is the only file required to make a child theme. Ensure that the style sheet must start with below mentioned lines:

1. /*
2. Theme Name: Twenty Thirteen Child
3. Theme URI: http://wordpress.org/themes/twentythirteen
4. Description: Twenty Thirteen Child Theme
5. Author: WPMU
6. Author URI: http://wpmu.com
7. Template: twentythirteen
8. Version: 1.0.0
9. */
10. @import url("../twentythirteen/style.css");
11. /* =Theme customization starts here
12. -------------------------------------------------------------- */

Changing each of the single line is easily possible in order to suit your theme, but make sure to keep Theme Name and Template lines and the @import section. It is one such template that is the folder name of the parent theme.

Now, you can activate your child theme and make sure to login to your WordPress website and go to Appearances > Themes. In the obtainable list of themes, you can find your child theme and click activate. Now, you child theme must be the active theme.


Second – Modify Your Theme’s CSS

Now, your child theme is working like a treat and it can give a look like the parent theme as we have imported its CSS file. If you have decided to change the theme’s CSS, ensure that you add any changes to your website after the original theme’s CSS is loaded. Now, you can say that you wanted to change the text in the theme, so it is pink. You only have to do is add a line to the child themes CSS file:

/*
Theme Name: Twenty Thirteen Child
Theme URI: http://wordpress.org/themes/twentythirteen
Description: Twenty Thirteen Child Theme
Author: WPMU
Author URI: http://wpmu.com
Template: twentythirteen
Version: 1.0.0
*/
@import url("../twentythirteen/style.css");
/* =Theme customization starts here
-------------------------------------------------------------- */

p { color: #FFDFDD;}

By this change to the child theme’s CSS, the original CSS for the patent theme will overwrites. Now, you website looks like this:


Third - Edit the Functions.php File

At the themes main functions, you can find functions.php file that and if you are looking to add custom functions to your theme, you can easily do so by developing a new functions.php file under your child theme folder.

Not like style.css, the functions.php file in a child theme doesn’t supersede its counterpart from the parent. Now, your child theme’s functions.php file will initiate with a php opening tag and end with a php closing tag. However, you are allowed to add your own functions in between.

1. <?php

2. // Stick your php code in here

3. ?>

Fourth – Make sure to edit other themes files

Not like functions.php file, the functions for your theme are other PHP files are not imported automatically. By replacing the file with a copy, it is possible for you to edit other files as well.

Now, the original file of theme is ignored and the new one is used. If you are looking forward to make any changes to 4.0.php file, you need to make a copy of the old field and paste into the child theme. Now, you can make any changes as per your requirement, once the file has been copied.

So, these are the four east steps to develop a WordPress child theme. However, you can also hire a professional WordPress developer for it and get an excellent quality theme development service. You can contact here : info@perceptionsystem.com

A High School Student Become a Specialized WordPress Developer – Really?

In the last couple of years, WordPress platform has been expanded dramatically as a more wonderful Content Management System. When it comes to talk about the latest version of the CMS, it had more than 8,000,000 downloads worldwide.

For all the old internet illiterates, it is an easy to access system without learning about some weird subjects like HTML, PHP and CSS.

Today, WordPress is widely used by people worldwide as it comes with thousands of attractive and out-of-the-box designs and plugins that can add some extra features to this platform. People can use this platform for anything like personal website to massive commercial as well as news websites.
However, it is essential to make this platform easier so that people, who do not have any knowledge about this platform, can access their websites or blogs without any hassle. Someone has to develop some wonderful designs and plugins that enhance the functionality of website.

With increasing the number of websites using WordPress platform, there are lots of non-qualified developers as well, who are young, self-obsessed and self-taught to earn good money while they are stilling going school. Yes, you read it correct, you can find many developers, who are still going in schools and studying.

One of such WordPress developers is Sarah Gooding, who is a professional WP expert, and author at WPTavern. A high school student ‘Sarah’ becomes a professional WordPress developer, but what the importance of mentors:

Sunny Ratilal's WordPress adventure started when he was 13 years old. While learning how to build a custom content management system, he stumbled upon WordPress and started fiddling around with it to learn more about its features. At the age of 14, he landed his first client. WordPress ticked all the boxes for the client’s requirements and Sunny launched his career as a professional WordPress developer.

Fast forward to three years later, Sunny is now 17 years old and currently in Sixth Form in London. When not busy studying, he enjoys developing custom plugins for clients and is also a prolific contributor to Easy Digital Downloads, having logged an impressive 1,097 commits to the codebase.


Contributing to Open Source Projects to Learn:

At the time of contributing to EDD, Sunny said that he got huge information about working in remote teams.
Working alongside EDD developers, we’re scattered all around the World! Some are based in the US, England and even New Zealand! Remote teams are fantastic because it always means someone is around whatever time of the day.

Getting involved in EDD changed Sunny's life and opened him up to a new world of collaboration.
Open source software has empowered me to code,
he said.
Contributing to EDD was my first open source project which gave me confidence to contribute to other smaller plugins and then eventually WordPress Core, submitting my first patch to WordPress last year.

Some Advises for Developers to Keep It Clean and Simple from Sunny:
Firstly, he said
Don’t build the extension because it’s something that’s required; build it because you want to build it. Build something you’re really passionate about; that’s what’ll give you the most pleasure whilst coding it. The key to success is not all about marketing the plugin, it’s about how the plugin is written.

● Firstly, write down clean code.
● Then, document it very well.
● Now, ensure that you make the code effective and don’t have lots of WP_Query instances or load numerous JavaScript/CSS files.
● Never, give your customers a single chance to complain, so opt for a complete feature list and beta test for sure.
● Offer wonderful support to all customers.


Significance of Having WordPress Role Models

Sunny said that it is highly important all the people, who are leaning and working with WordpRess, have good role models. Good role models always inspire them to further develop his skills. He said
I have three very important role models: all three are fellow WordPress developers: Tom McFarlinPippin Williamson and Mark Jaquith
.
He also added,
They are exceptional developers who have a myriad of knowledge. The plugins/themes they create are made with other developers in mind and their coding is by far some of the best you will ever see.

So, learning and working with WordPress is not as easy as it sounds, one just needs courage and passion to do anything with this platform.

13+ Brilliant WordPress Tutorials For Creating and Managing Your Own Site

Who’s got time to read boring books? Here are 13 best WordPress Tutorials that helps you to develop and manage your own site easily. Before moving towards tutorial section, continue reading what actually WordPress is.

13 Brilliant WordPress Tutorials For Creating and Managing Your Own Site

WordPress is an open source content management systems that based on PHP and MySQL. A plug-in architecture and a template system are some exceptional features added in WP. WordPress is one of the most popular blogging systems with more than 60 million websites on the Web.

Due to its huge popularity, there are uncountable WordPress tutorials available online. Check out some of the best collection given below:


1st How to Manage WordPress Posts with PHP? [ Part - 1 | Part - 2 ]


Harri Bell Thomas Tutorial

If you are looking to extend the basic functions of your WP site, then this tutorial is best for you. Going through this tutorial, you can able to 'Create WordPress Posts And Pages Using PHP' step-wise. Harri Bell-Thomas is an expert coder and graphic designer who has written this tutorials to help me and you. ;)


2nd How to Retrieve Posts with Multiple Taxonomies?

Go through this tutorial and simply stamp your data – in WordPress with multiple taxonomies. If you have queries related to custom post types, and custom taxonomies, then this tutorial is created for you only.


3rd How to Build Your Own Custom WordPress Search?

This tutorial helps you to create your own custom WordPress search and search out some exceptional well WordPress search secrets. Go through this post and know how to build a secondary search engine that has specific requirements.


4th How to Upload Files in WordPress?

This tutorial teaches how to upload file into a custom post type by using an input element instead of using the WordPress media uploader.


5th How To Change And Reference Various WordPress Directories?


Change And Reference Various WP Directories

This tutorial implements the wp-content directory and URL using constants in wp-config.php for editing wp-config.


6th How to Create a WordPress Team Page?

Do you want to create WordPress Team Page? Create WP team page with a couple of clicks from the WordPress admin UI and without writing a single line of PHP code. Look at this tutorial for more information.


7th How to Delete Files in WordPress?

Want to remove old files from WP? Simply go through this tutorial and learn how to remove the files and the Meta data easily.


8th How to Add Password Strength Meter Script?

Check out this tutorial and know how to use the WordPress' password strength meter in your own forms using the script.


9th How to Allow Guests To Post?


Allow Guests To Post

If you want to allow a guest or regular contributor to create a post without requiring access the WordPress admin interface, then this tutorial is especially created for you. Check out and add functionality.


10th How to improve WordPress comments?

This tutorial helps to enhance default WordPress comment behavior and give information about how to enhance the overall experience of improving WP comment section.


11st How to Create Static Front Pages in WordPress?

If you want to setup a static WP page then go through this tutorial as it taught about how to set it up within the context of the WordPress dashboard.


12nd How to Deactivate WordPress Multisite properly?

Check out this tutorial, if you want to grab an idea about how to remove any remaining sites, unwanted users, Multisite lines from WP Config and many more things.


13th 14 Handy WordPress Hacks


WordPress Hacks

On this 13th I like to dig more deeply with more 14 hacks. ;) Going through the list of above given tutorials, you will get to know how to manage particular WordPress features.

In comment, +AlexCooper has suggested more WordPress tutorials of WPEagle. They seem nice.

If you have some more tutorials that would help our readers, then tell us through comments.


WP CleanFix - A New & Simple Way to Keep WordPress Database Clean

WP CleanFix is one of the excellent WordPress plugins that check, repair, fixes and optimizes your WordPress blog in an exceptional way. Yes, you read it correct. WP CleanFix has got fresh update to its release and now it brings innovation with its features, performance and functionalities.

WordPress Database Clean

Many of you all may still don’t have information about CleanFix, which is the most powerful WordPress plugin, to take care of lots of unnecessary data that stores in your databases such as post revisions, the like, not-so-updated tables, spam comments and more.

With just one simple click, you can run your WordPress site very effortlessly. In addition, it is all in one plugin that mainly designed to check, repair, fix and optimize one’s WordPress blog and website.

Finally, this plugin gets more power with its new release that introduces many new features and newness to this plugin. Without discussion more about it, let’s have a look on what’s new in this plugin:

CleanFix’s latest and new release is completely wonderful as it comes with unique features that users have been asking for very long time. Describing its all new features here is not possible, but we can give a look on major features that widely demanded by users.

Added (WPDK) User Transients Checking And Cleaning

Added Check
For Unapproved,
Trash and Spam Comments

Added Transients Checking And Cleaning

Extends HTML Editor: Fontname, Size, Color, Extra Tags

WordPress MU Compatibility

Database Tables Optimization

Pay And Get Updated Version


Apart from these features, there are many other features that are added in this plugin. The new release of CleanFix is a paid version for all those, who are new to this plugin. However, current users can get the new release for free.

Well, this one such plugin that is perfect for all, who are looking to get rid of irritated database management that regularly increases problems. With this plugin, they can literally clean their WordPress site up from missing categories, Meta tags, users and more.

The best part of this plugin’s update is that it representing lots of functions that provided as single plugins. You can easily make them obtainable very easily through a clean dashboard for the website management.


New CleanFix - for $15

When it comes to new CleanFix, it is obtainable for all the new wpXtreme users with huge discounted amount $15. It is a highly powerful plugin, but the price is much competitive compare to its usefulness.

If you are impressed with the features of new CleanFix, make sure you purchase it for your website and keep your WordPress site clean. Once you purchase this new plugin (CleanFix) for WordPress, you will get following mentioned things:

The all new CleanFix for WordPress and its updates that comes with it for 1 year.

It doesn’t matter whether you are familiar with WordPress or not, you can get excellent customer support.

All the new features and improvements obtainable to CleanFix users.


Its clean and
simple UI allows users enable/disable every single feature very smoothly with just one single click.


So, it is one of the excellent releases of CleanFix plugin that make it extremely easy for WordPress site and blogs to face up with unnecessary data. To get more information on WordPress plugins and its development, you can click here.

Images made by Freepik.com

wpForGlass – A New & First WP Plugin for Google Glass

Today, Google Glass is one of the trendiest technologies with an optical head-mounted display, which is being developed by Google in the Project Glass research and development project. Across the world, lots of people have appreciated this product because of its incredible features.


Before this product launched in the market, it already got a WordPress plugin. Isn’t it completely amazing?

At Weber Shandwick, a PR and communication firm, a team of experienced people has developed the first WordPress plugin called wpForGlass, which easily interfaces with Google Glass in order to publish content without any hassle.

Google Glass’s first WP plugin lets users to post to their WordPress blog from Google Glass. It is completely wonderful for WordPress users, who need to post any important stuff on the go.

At the moment, this plugin is operated by touch; however, according to Mashable a team of WP developers also planned to add voice commands but now it's "in the pipeline."

Now, wpForGlass makes it easily possible for people to take a photo, video or anything and quickly send it to their WordPress blog. Users of this plugin can also speak any caption before their media is uploaded.

Moreover, the use case of this plugin is much clear as it uses the Mirror API from Google to enable users to post pictures and videos with Google Glass on their blog.

Many of you all may think how this plugin works and what kind of features and benefits it offers in our day-to-day life. Well, using this plugin is not a big deal as WordPress user can use this plugin that interfaces with Google Glass to publish content.

Let’s give a look on wpForGlass plugin’s uses, features and how it works:

wpForGlass – How it works?


When it comes to wpForGlass, it uses Google’s Mirror API in order to send out the data through Google server. All the users will need an SSL certificate, when they first set up this plugin.

The certification of this plugin gives an ability to set up cron jobs and Mirror API Access to develop an OAuth 2.0 client ID for your application.

Moreover, it is also crucial to note that the shared media is practiced on Google servers, and then downloaded to the WordPress website that may take some minutes to process.

Here’s a video by the plugin’s creator demonstrating how it works.


wpForGlass – Give New Height to Journalism & Live Blogging


wpForGlass is one such WordPress plugin for Google Glass that has the potential to be revolutionary for journalism. This plugin made it extremely easy to deliver content and news to people in a live environment. Being a highly beneficial plugin for journalists and live bloggers, this plugin allows hands-free and propinquity publishing benefits to users.

Recording events and transmitted in near real-time becomes much easy for people and they don’t need a live news station camera feed also. It has capability to shoot and transmit pictures, videos and other stuff to a blog in a hands-free environment.

It opens many new capabilities for journalists, documentations and bloggers, who were until busy to carry their notepads, camera and phones in their hands to observe and report. Google Glass’s plugin code is open source, so Glass explorers can take benefit of this plugin.

Weber Shandwick's vice president of technology innovation Ozzy Farman said

Instead of pulling out a phone or camera to take a picture that needs to be posted online right away, this is so much easier.

He also added

The process of publishing through Glass feels as instantaneous as blinking (or winking). We feel that in today’s socially driven media environment, instantaneous publishing is going to be, hands-down THE killer app for Glass.

So, all the journalists and live bloggers can make use of this plugin to make their work a lot easier than before and enjoy a complete range of features.

Wrapping Text:

Recently, Folks at Weber Shandwich has launched the first WordPress plugin for Google Glass that interfaces with Google Glass in order to publish content without any hassle. This plugin is completely amazing because of its wonderful features that allow users to publish images and videos on the go.

Image Credit: rimazrauf.com, WordPress